In a previous tutorial, you learned how to Extend Facebook Static FBML Tabs with Dynamic Content, and now we’re back to show you how to take it even further by creating sub-nav tab navigation within your Static FBML microsite using only DynamicFBML.
The previous tutorial, I walked you through how to use clicktohide and clicktoshow to enhance your Facebook Fan Page tab. By utilizing these built-in Facebook functions, we can get creative and make image galleries, slide shows, or micro-sites within a single Facebook Fan Page tab. This is especially handy if you’re trying to fit a lot of content into a single tab, but don’t want to have one long scrolling mess of a tab. While hand-written FBJS is always an option, Facebook makes it really easy to accomplish this with only the most basic coding skills.
(That said, if you haven’t read the first tutorial, it will probably be helpful for you to read that one first before continuing with this one – I assume you understand the concept of clicktohide and clicktoshow here.)
So what you’ll end up with is a single Facebook Fan Page tab that has a “main” navigation that switches content within that single tab, and an additional subnavigation menu that switches content within that one section of the tabbed content. It sounds more confusing than it actually is – click here for a demo.
This is what we created in the previous tutorial:
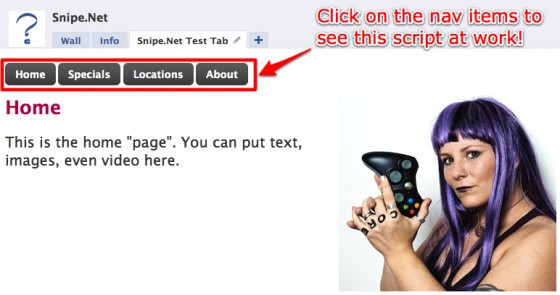
And this is what we’re going to create in this one:

Similar to the example in the first tutorial, we’re going to do all of this magic simply by using CSS, HTML and the clicktohide and clicktoshow functions. In fact, what we’re doing here isn’t that different at all from what we did the first time, but I get a metric-assload of emails asking me how to to it, so here it is.
[html]Home
Demo Tab
Locations
[/html]
And that’s it. That’s the whole code snippet. For clarity, I have stripped out all of the extra styling, text and fancy button treatments. If you want the exact code used for the demo, scroll down further in the page – I’ve included that as well.
I’ve commented the code pretty liberally, but just to recap what we’ve done, we created the normal main microsite divs, nav1, nav2, and nav3. These are the “buckets” that contain the top-level “tabs”, same as we did in the first tutorial. What we’ve added is a second, smaller set of buckets and corresponding nav. We use the exact same method of clicktohide and clicktoshow – the only different is what we’ve name the smaller bucket divs, and where they live. The div structure works out to be something like this:
-- nav 1 content -- [subnav 1 div]
-- subnav 1 content -- [/subnav 1 div]
-- [subnav 2 div]
-- subnav 2 content -- [/subnav 2 div]
-- [subnav 3 div]
-- subnav 3 content -- [/subnav 3 div]
[/nav2 div]
[nav3 div]
-- nav 3 content
[nav1 div]
As promised, here’s the exact code snippet, line by line, that was used to create the demo page.
[html]
Default Content
Click on the “Demo Tab” above to see an example of
multi-level tabbing in a purely FBML microsite.
With a little practice and patience, you could
recreate a fairly large website using this method.
(The content of these subnavs are quotes from
Monty Python and the Holy Grail, for your entertainment.)

[/html]
The above is the exact code snippet I used to create that demo page, specifically. (In other words, please don’t email or comment asking me for the source. This is ALL there is, including the yummy button styling.)
As long as you properly nest your divs (and use valid HTML with no wonky or open tags), this will work every single time. The names of the divs don’t matter, as long as they match the clicktohide/clicktoshow div names you’re specifying in the nav.
If it doesn’t work when you try it, and you’re 100% sure you copy+pasted exactly from this tutorial, try again later. Sometimes Facebook has issues, and the only way to work around it is to wait until they’re not having issues.
I’d like to once again remind you that you’re not at all restricted to using the clicktohide and clicktoshow functions in the way I’ve outlined them here. My goal isn’t to show you the only things that are possible , but rather to get you familiar with the concepts so that you can use your own imagination and apply them in unique and exciting ways.
If you’ve done something cool with clcicktohide/clicktoshow (and let’s not forget clicktotoggle from the last tutorial), make sure you drop a link in the comments. I love to see what other people are working on. It makes my own raging Facebook development Hell a little easier to bear.